In order to keep my hands dirty, I reached out to the Cisco DevNet team to see if I could help them out with literally anything. I happened to be at KubeCon and met up with Mandy Whaley, who led me to Anne Gentle. Both amazing people working with DevNet, and they said I could help them by going through some of the DevNet labs and make corrections. This meant actually using GitHub beyond my usual creating a repo and leaving it to collect dust for years. Anne has been awesome showing me how to go through and create issues and pull requests (sometimes twice) and I thought I’d share a little knowledge here (or at least have a nice little KB for myself).
You’ll need to install Git on your computer
Guys, I’m using Windows 10, I don’t need your judgment. I love Windows! But everything here will be from a Windows perspective, even though you can pretty much use any other OS.
Let’s get started….
Issues
First off, it’s always good to create an issue. This doesn’t change anything, but may alert the right folks and also gives you some documentation for what you’re changing. This is pretty easy.
- Get on GitHub.com and go to the repo you want to work with
- Click on the Issues tab
- Click the New Issue button
- Give your issue a title and description and submit it.
Now it gets a bit more complicated…but I promise will become second nature very quickly. Eventually we’re going to create a Pull Request. This basically means you want to submit a correction (could be a spelling error, an updated screen shot, or a correction in code, etc.). But, there are a few things you need to do first.
Forks
You want to create a fork, because you don’t want to submit corrections directly to production. That’s just bad manners.
- At the top right of GitHub you should see a Fork button, click on that.
- You might have a few places to put it, but if you’re new, likely you just want to click on your own username.
- That should do it. You’ll see a link in the top left, copy that link and save it somewhere. It might be your username followed by the repo name. We’ll need it later.
Cloning Repos
So, we’ve created a fork to use for later. We want to be able to work on this stuff on our local computers, though. That’s where cloning repos comes in. We can download all of the files from that GitHub repo to our local computers by using the clone command.
- While under the Code tab in GitHub, you’ll see a green button that says Clone or Download. Click on that.
- It will give you a copy option, click that button, too.
- Back in the command line, since you already have git installed, you can type in: git clone [repo name] where the repo name is what you just copied off GitHub.
- Press enter and it should download to your computer.
- Use the command line to go to that directory. Ex: CD MyRepo
Making Edits
The whole reason you’re doing this is to modify something.
- When you’re in the right directory, that has the file you want to change, type in start [filename]. Where the filename is the file you want to modify.
- If you’re modifying text, it will bring up a notepad. You can go ahead and change the text via normal means and click save. If you’re updating a screenshot, bring up the directory of images and copy the new image in with the same filename as the old image you’re replacing.
- Close out the folder or file.
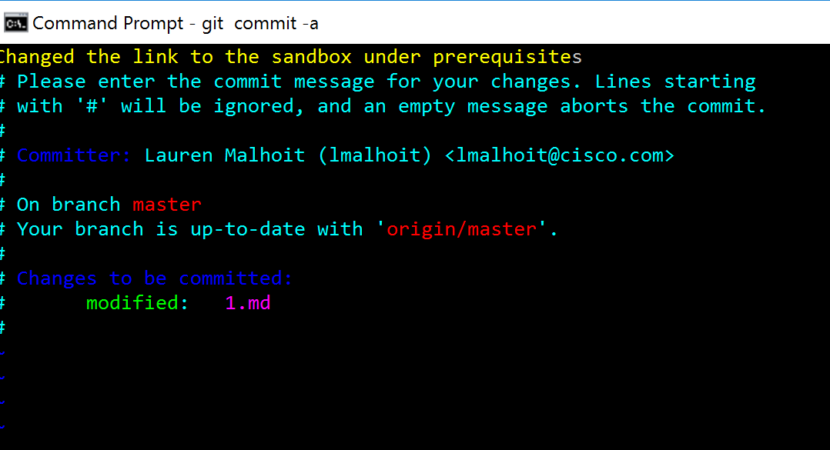
Commitment
Making commits says that you’re willing to make a commitment, but you’re not willing to put it on Facebook yet…errr…on GitHub. You’re really just marking the files that have been modified.
- First to a git status
- If everything is right, you should see the file you modified come up.
- Then type git commit -a
- This brings up a VI window (I know, I’m a nano girl, but it’s not too bad). At the top of the VI window, just type what you changed. Specific documentation is great and helpful! Make sure you don’t put a # before your documentation because that will comment it out.
- When you’re good with what you’ve written, hit ESC. Now type :wq and press Enter. Weird right, if you have questions on that, look up VI editor stuff.
Adding Forks Locally – Remotes
So we created a fork in GitHub, but our computer doesn’t really know about it. We need to create some remotes so we can eventually push our changes to the right fork.
- Do a git remote -v
- This shows you probably the origin file, we don’t want to use that. We want to use our own fork.
- Remember the link we copied earlier when we created the fork, go copy that.
- Do a git remote add [remotename] [link-to-fork]. The remotename here is arbitrary, just make it something logical that isn’t too long to type.
- If you do another git remote -v you should see your new fork in there.
Ahhh…Push It
Okay, we’ve gone through all of that, but we need the administrators to be able to see it on GitHub. So, this is where we make things public.
- Type git push [forkname] branch where the branch could be master, or it could be a patch you’ve already created in a different pull request. We’ll get to that…
FInally…Pull Requests
We need to make the Pull Requests so that folks know we’ve made some changes (or maybe suggestions in some cases).
- Get back on GitHub
- Make sure you’re in the right repo
- Under the Code tab, click on New Pull Request
- It may look like there’s nothing to compare, this is when you need to click the link Compare Across Forks.
- Select your fork on the right side
- Hopefully there are some things that are different between your fork and the master (production). If so, you can create the pull request and see that the proper changes are there.
- Now an admin, or someone with privileges, will come through and merge. Your changes might just be in production!
Okay, all, I’m somewhat new to this. So, if you have questions, comments, concerns, criticisms, or any feedback at all. Please reach out! @malhoit